The instrument printing feature enables you to print checks.
1. Navigate to Payments.
2. Click Instrument Printing. The Instrument Printing page is displayed.
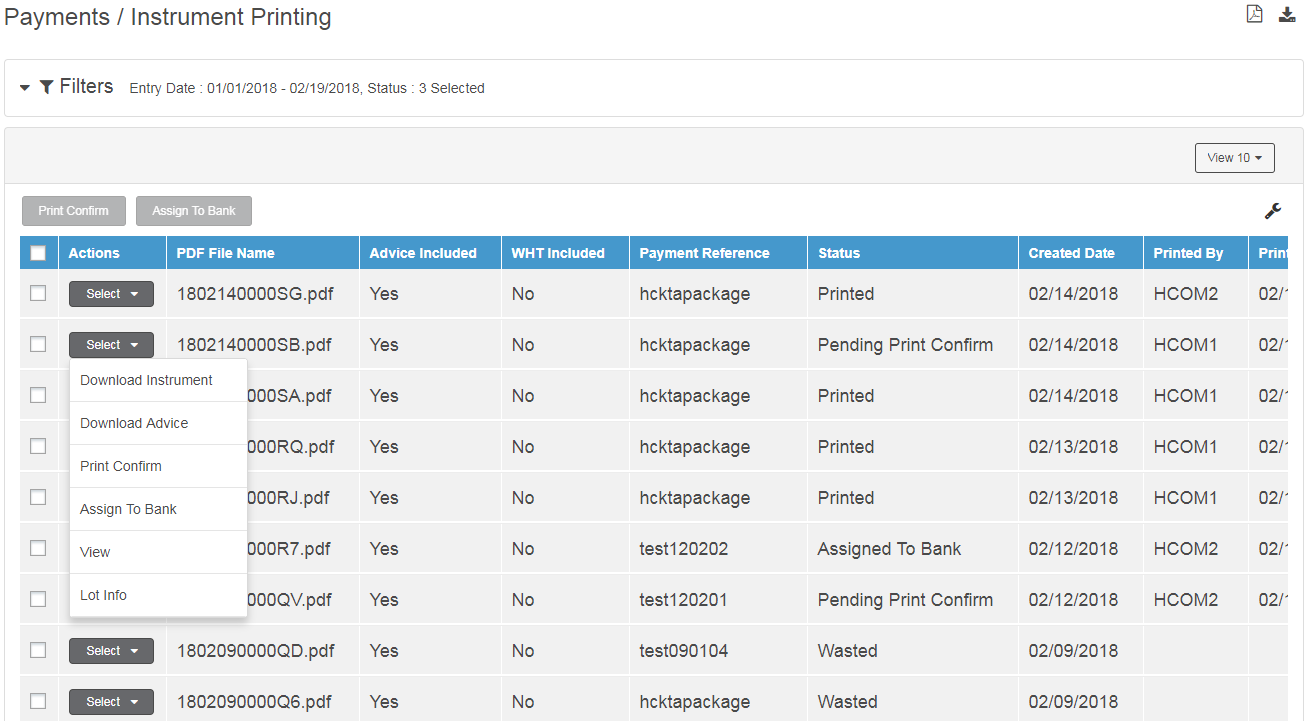
3. Click Select drop down for the instrument that you want to print.
![]() Ready
to Print status is displayed for the instrument.
Ready
to Print status is displayed for the instrument.
4. Click Download Instrument. The PDF gets downloaded.
5. The PDF file
could be password protected based on the bank setup. When you access the
PDF file, specify the password. Your password to open the pdf is logged
in User Id@Print Number.
Example:
Logged in user id = USER101
Print Number (generated by system) = 140515000012
Generated password = USER101@140515000012
6. Verify the downloaded check details for printing and print the check instrument.
7. After the check is correctly printed, you must mark the instrument as Print Confirm using the Select drop down. This activity marks the completion of printing.
![]() The check can be re-printed multiple
times till it is marked as Print Confirm.
After the check is marked as Print Confirm, option to download instrument
is not available.
The check can be re-printed multiple
times till it is marked as Print Confirm.
After the check is marked as Print Confirm, option to download instrument
is not available.
8. If you are unable to print the instrument at your end for any reason, you can assign the printing of the instruments to the bank. Select the instrument and click Assign to the bank. The record is sent to bank for printing.
![]() Since the MICR and stationary is available
with you, you must send the stationary to the bank.
Since the MICR and stationary is available
with you, you must send the stationary to the bank.
Information about instruments in various stages of printing is displayed in the summary grid. The following table elaborates the layout and activities that can be performed on the Instrument Printing page.
Page Element |
Description |
Customizing summary page |
Using
the |
Refresh Data |
Using
the |
Filters |
You can narrow down to the required records using the PDF File Name, Entry Date, Status, and Assign To Bank filter criteria.
You can also filter records based on the following statuses: • Ready for Printing: The instrument is ready for download. Download the instrument and print. • Pending Print Confirm: The instrument is pending for print confirm. Once marked as Print Confirm, the instrument is ready for delivery. • Assigned to Bank: Assign the instrument to the bank for printing and delivery. • Wasted: Mark the instrument as wastage if the instrument is not valid. • Partial Printed: In a batch, some of the instruments are printed. |
Table columns |
Using
the |
Possible actions on an instrument |
The actions are available in the form of a button or in the drop down list against a record. You can select multiple records (requiring same action) and click action button. Or You can take action on an individual record using the drop down list. The following possible actions are available for instruments: • Download Instrument: Allows you download the instrument. • Download Advice: You can download the advice that will be printed on the instrument. Example: Logged in user id = USER101 Print Number (generated by system) = 140515000012 Generated password = USER101@140515000012 • Print Confirm: If the instrument is printed correctly and no further printing is required, you must click Print Confirm to complete the printing process. • Assign To Bank: You can send the instrument to the bank for printing. • View: You can view the instrument printing details. • Lot Info: You can view the details of the instrument lots assigned to you for the select Company and Product. |
Selection box |
Select the check box corresponding to the record and perform the required action. |
Pagination Bar |
Depending on the volume of data displayed in the list, the list can have one or more pages. You can navigate through the page by using the pagination bar. |
Export |
You can export summary information file to the required format such as XLS, CSV, and TSV.
|
Report |
You can generate a PDF report of the summary information. |
![]() Related topics
Related topics
![]() Instrument wastage and
re-issuance
Instrument wastage and
re-issuance
| © 2017-19 Finastra International
Limited, or a member of the Finastra group of companies (“Finastra”).
All Rights Reserved.
Cat ID: FCM4.6-00-U02-1.5.3-201903 |