Fusion Cash Management (FCM) enables you to generate reports at pre-defined schedules in the required format. You can schedule a report to run repetitively on the desired medium. Once scheduled, FCM generates such reports without any user intervention.
1. Navigate to Reports.
2. Click Report Center >> Add (from grid). The Schedule Report page corresponding to the report displays a list of existing schedules for that report.
3. From the Select dropdown click Add Schedules for the report to which you want to add the schedules.
To schedule a report, see:
To view an existing report schedule, see:
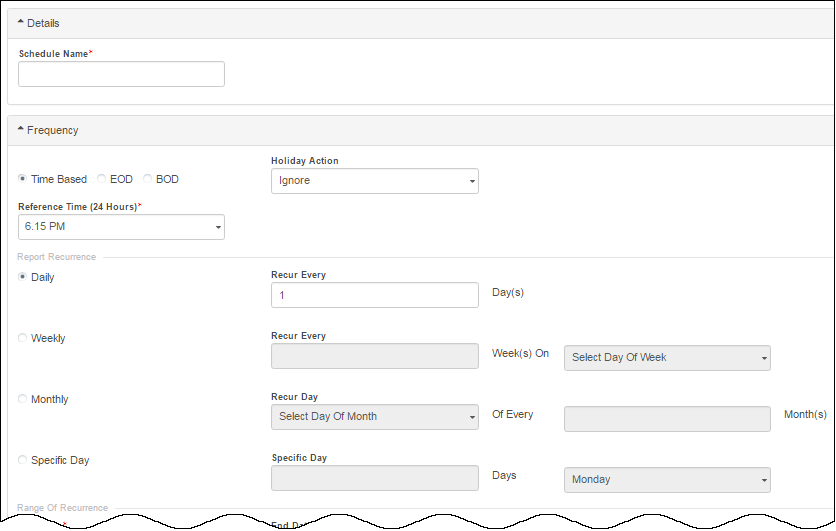
1. Specify the following frequency details:
• Schedule Name: Specify a name to identify a schedule to be defined.
• Select Frequency of the schedule:
– Time Based
– EOD
– BOD
• Holiday Action: Specify whether the schedule of report must be preponed or postponed, if the schedule date of the report falls on a holiday. The available options are:
– Ignore
– Next Business Day
– Previous Business Day
– None
![]() You can also choose to cancel the report
execution, if the scheduled date falls on a holiday.
You can also choose to cancel the report
execution, if the scheduled date falls on a holiday.
• Reference Time: Select Time Based option and specify the reference time at which you want the report to be generated.
• Report Recurrence: Specify the required report recurrence to generate the report. The available options are Daily, Weekly, Monthly, and Specific Day.
![]() If
the frequency selected is ‘daily’, the Recur Every Day (s) field would display 1 to 7 (every nth day), representing the number of days
in a week.
If
the frequency selected is ‘daily’, the Recur Every Day (s) field would display 1 to 7 (every nth day), representing the number of days
in a week.
If the frequency selected is ‘weekly’, the Recur Every Week (s) field displays values for every nth week (like every 2nd week). Select the day from drop-down list.
If the frequency selected is ‘monthly’, the Recur Day field displays values 1 to 31 (every nth month). Specify the day of the month.
• Range of Recurrence: Specify the required range of recurrence to generate the report. Specify the following details:
– Start Date and End Dates: Select the start and end dates.
– Previous Generated Date: This field displays the application date as by default and cannot be edited.
– Next Generation Date: The next generation date is displayed from the calendar and cannot be edited.
– Email: Specify the email ID to send the report to any specific identity.
– Report Format: Select the required report format from the available options: PDF (default), CSV, and XLS.
– Pre Generated: Specify whether you want to receive the pre-generated report on your email ID or not.
2. Specify the respective schedule parameters. The schedule parameters are displayed based upon the selected report. Some general parameters are:
• Date
• Account Number
3. Click Save and Exit to save the schedule and go back to summary page.
![]() Click Save
and Add to save the existing schedule and add a new schedule.
Click Save
and Add to save the existing schedule and add a new schedule.
You can view the list of report schedules from the Report Center.
1. To view the schedules of a particular report, click Add hyperlink corresponding to the report. The Schedule Report page is displayed. A list of schedules is displayed under Existing Schedules.
2. Select a required report schedule to enable or disable.
![]() Related
topics
Related
topics
| © 2017-19 Finastra International
Limited, or a member of the Finastra group of companies (“Finastra”).
All Rights Reserved.
Cat ID: FCM4.6-00-U02-1.5.3-201903 |