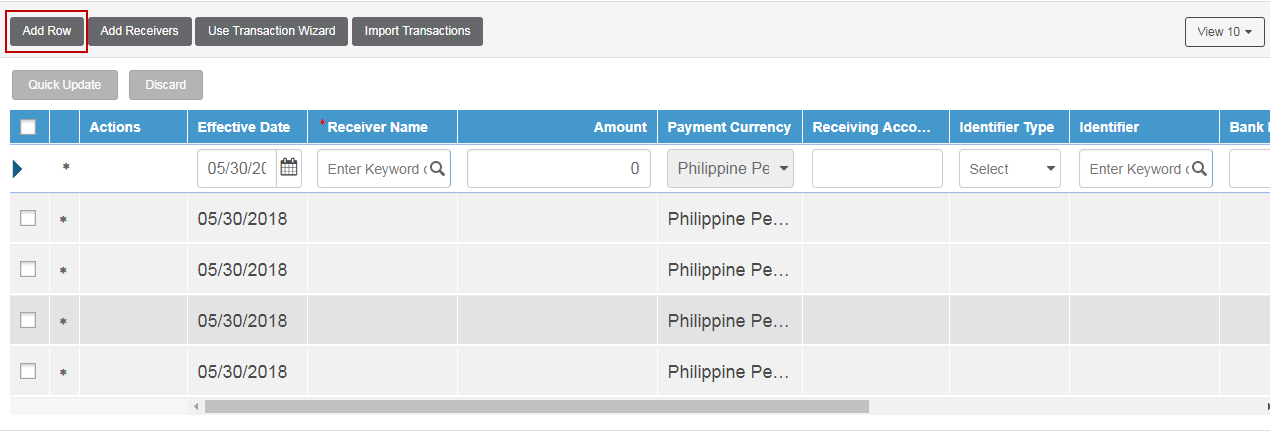
You can add multiple instruments to a batch payment.
You can add multiple instruments to a batch.
1. Specify the following details:
• Effective Date: Select the required effective date.
• Receiving Name: Search and select the required receiver to whom the fund is to be transferred.
• Amount: Specify the amount.
• Select the Amount CCY, as Transaction or Debit
– Transaction: Specify the amount the receiver receives after the currency conversion.
– Debit: Specify the fixed amount the receiver receives irrespective of the currency conversion.
• Payment Currency: The payment currency is auto-populated. This field is non-editable.
• Receiving Account: Specify the receiving account number.
• Identifier Type: Identifier type is a type of recognizing code assigned to a bank/branch. Select the required bank Identifier Type.
• Identifier: Based on the selected Identifier Type, search and select the required Identifier.
• Bank Branch Name: Specify the required Bank Branch Name.
• Payment Reference: The Payment Reference is auto displayed and editable.
• Status: The status is auto-displayed.
2. Click Verify.
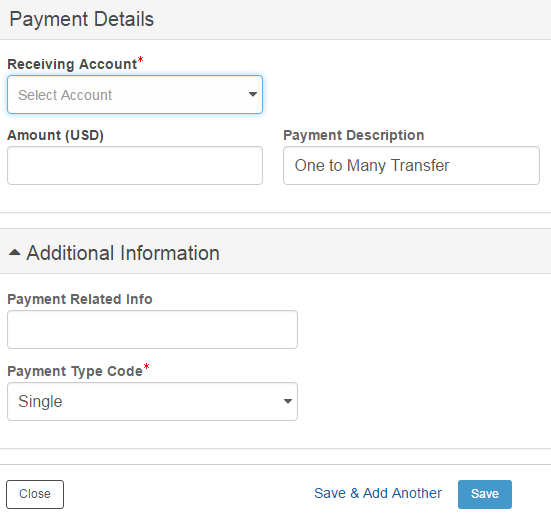
You can make payments to multiple accounts using a batch.
1. Click Use Transaction Wizard.
2. For more details about the fields for selected payment type, see Specifying international payment transfer details.
3. Click Save.
![]() To add multiple accounts, click Save and Add Another.
To add multiple accounts, click Save and Add Another.
4. Click Verify.
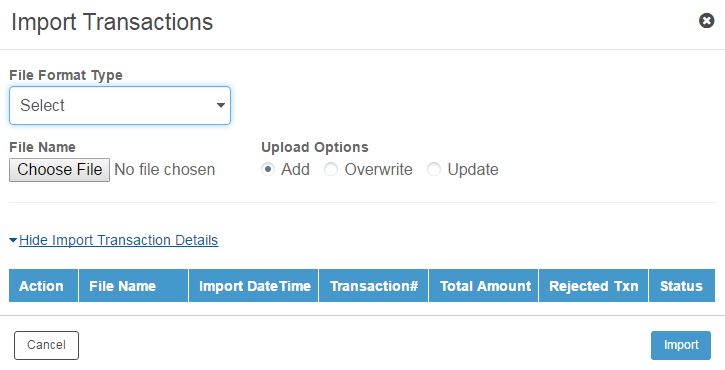
You can upload a file containing multiple transactions.
1. Click Import Transactions. The Import Transactions pop-up is displayed.
2. Specify the following details:
• File Format Type: Select the type of file format from drop-down list.
• File Name: Click Choose File and select the file to be attached.
• Upload Options: Select the required option to upload a file. The available options are:
– Add
– Overwrite
– Update
3. Select the required File and click Import. A list of uploaded files is displayed on the payment details page.
4. Click Verify to verify and submit the batch payment template.
![]() Where to go from here
Where to go from here
![]() Verifying and submitting a batch payment template
Verifying and submitting a batch payment template
| © 2017-19 Finastra International
Limited, or a member of the Finastra group of companies (“Finastra”).
All Rights Reserved.
Cat ID: FCM4.6-00-U02-1.5.3-201903 |