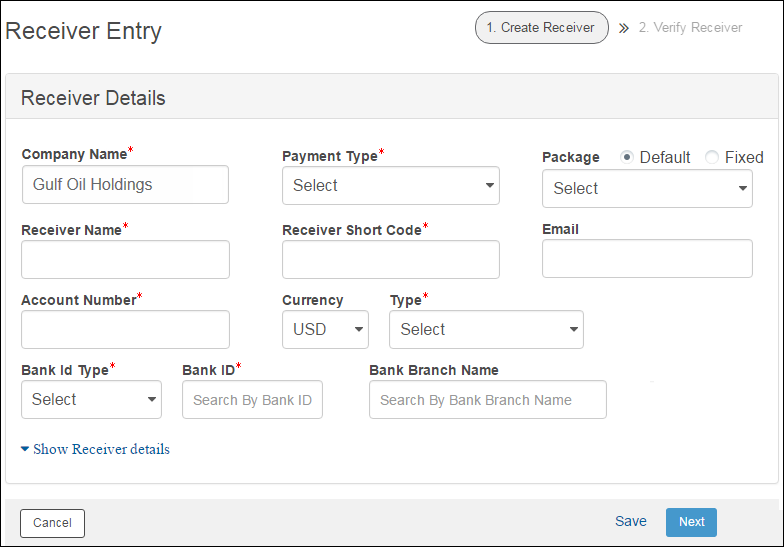
Receiver details are grouped into personal, bank, and account details.
![]() Fields marked with an *
are mandatory.
Fields marked with an *
are mandatory.
1. Navigate to Payments.
2. Click Receivers. The Receivers page is displayed.
3. Specify the following information:
• Company Name: Company name is auto displayed. If you are a multi subsidiary user, you can select the company name for which the receiver is to be defined..
• Payment Type: Select the required payment type to make a payment. Specify the details for the following Payment Types:
– Wire: For wire, specify the Receiver account, contact, and bank address details.
– Interbank Transfer: For interbank transfer, specify the Receiver account, contact, and bank address details.
– Account Transfer: For Account Transfer, specify the Receiver account and contact details.
– International: For International payments specify the following details:
□ Receiver Contact Details
□ Receiver Bank Address details
□ Receiver's Correspondent details
□ Intermediary Bank details
• Package: Specify whether you want to use Default or Fixed payment packages and select the required payment package. You can create payments directly for the user and such payments use the payment package associated with the user.
![]() When you select the Fixed
option, the Package field becomes
mandatory. The Fixed option helps
you to maintain an exclusive relation between the receiver and payment
package.
When you select the Fixed
option, the Package field becomes
mandatory. The Fixed option helps
you to maintain an exclusive relation between the receiver and payment
package.
• Receiver Name: Specify the receiver name. Select the payment type and receiver to initiate the payment.
![]() Click here to view the special
characters allowed for the Receiver Name field.
Click here to view the special
characters allowed for the Receiver Name field.
• Receiver Short Code: Specify a short code to identify the receiver.
• Email: Specify the email address of the receiver to which you can send automated intimation of the transactions.
The following fields are applicable only for the electronic
payments:
Account Number: Specify the account
number of the receiver.
• Currency: Select the required currency in which the receiver will receive the payment.
• Type: Select the required account type.
• Bank ID Type: Identifies in which bank group (ABA, SWIFT, CHIPS, MICR, BIC) the receiver is associated. Select a unique identification type for the bank. The bank Id types are displayed based on the selected payment type.
• Bank ID: Search and select the bank ID. The Bank Branch Name is auto-displayed.
 Alternatively, you can type in the field to get the options.
• Bank Branch Name: Search and select the Bank Branch Name. The Bank Id field is auto-displayed.
 Alternatively, you can type in the field to get the options.
4. Based on the selected transaction type, you must specify certain details that support a payment transaction created for the receiver in FCM.
• Receiver Contact Details
![]() Applicable for all payment types. Specify
address and contact number of the receiver.
Applicable for all payment types. Specify
address and contact number of the receiver.
• Receiver Bank Address
![]() Applicable for all payment types . Specify bank address of the receiver.
Applicable for all payment types . Specify bank address of the receiver.
• Receivers Correspondent
![]() Applicable for all payment types except
Wire payments . Specify the following details:
Applicable for all payment types except
Wire payments . Specify the following details:
– Bank ID Type: Select the required bank ID type.
– Bank ID: Specify the bank ID.
– Bank Branch Name: Specify the bank branch name.
– NOSTRO account: Specify NOSTRO account number of the bank.
![]() Nostro account refers to an account
that a bank holds in a foreign currency in another bank. Bank ABC based
in UK having currency in pound holds an account with bank XYZ based in
US with currency in dollar.
Nostro account refers to an account
that a bank holds in a foreign currency in another bank. Bank ABC based
in UK having currency in pound holds an account with bank XYZ based in
US with currency in dollar.
– Bank Address: Specify bank address.
• Intermediary Bank
![]() Applicable for International,
Cash Payment, Customer
Check, and Request To Transfer
type of payment. Specify the following details:
Applicable for International,
Cash Payment, Customer
Check, and Request To Transfer
type of payment. Specify the following details:
– Bank ID Type: Select the required bank ID type.
– Bank ID: Specify the bank ID.
– Bank Branch Name: Specify the bank branch name.
– NOSTRO account: Specify NOSTRO account number of the bank.
– Bank Address: Specify bank address.
• Default Transaction Setup
![]() Applicable only for Customer Checks . Specify the following details:
Applicable only for Customer Checks . Specify the following details:
– Default Payout Location: Search and select the location at which the instrument would be liquidated.
– Default Pickup Branch: Search and select the bank branch at which the instrument should be picked up by the receiver.
– Default Delivery Mode: Search and select the delivery mode of the instrument.
– Document Type: Search and select the document that should be used by the bank to identify the receiver.
– Document ID : Specify the document number.
5. Click Save and Next.
6. Validate the information on the Verify Receiver page and click Submit.
![]() All
receivers created or modified in Fusion Cash Management must be approved.
For more details about approval, see Additional
actions on setup.
All
receivers created or modified in Fusion Cash Management must be approved.
For more details about approval, see Additional
actions on setup.

| © 2017-19 Finastra International
Limited, or a member of the Finastra group of companies (“Finastra”).
All Rights Reserved.
Cat ID: FCM4.6-00-U02-1.5.3-201903 |