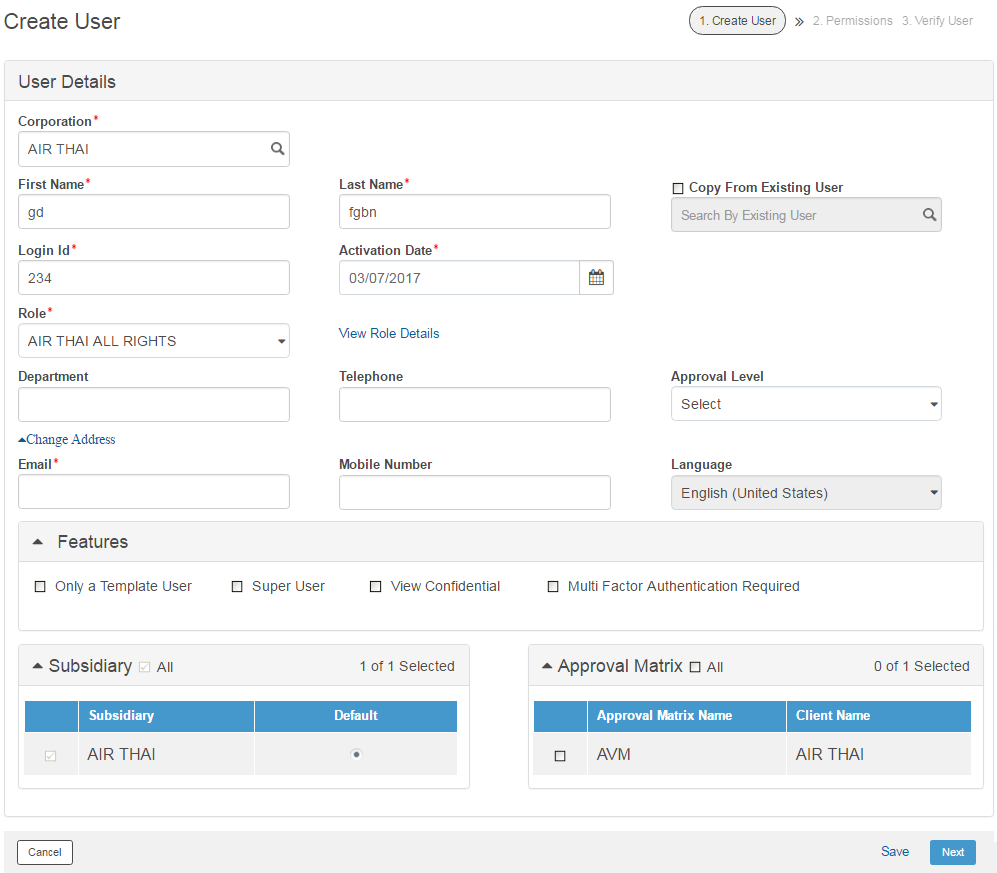
After defining the required roles, you can add users and assign users to these roles.
1. Navigate to Security.
2. Click Users. The Users page is displayed.
3. Click Create New User. The Add User page is displayed with the User Details tab.
4. Search and select the Company Name.
5. Specify the First Name and Last Name.
6. Select Copy From Existing User to define a new user based on an existing user. Search and select the Existing User Name.
![]() You can customize user features, as
required.
You can customize user features, as
required.
7. Specify the Activation Date from which the user should be activated.
8. Select the Role that you want to assign to the user. The View Role Details link is available on the UI.
![]() Only after approval of the user,
you can modify the Role associated
with that user. Also, after changing the role, Fusion Cash Management
(FCM) displays a popup stating that, revisit all the user specific linkages
as the linkages might have changed due to role change.
Only after approval of the user,
you can modify the Role associated
with that user. Also, after changing the role, Fusion Cash Management
(FCM) displays a popup stating that, revisit all the user specific linkages
as the linkages might have changed due to role change.
9. Specify the Department that the user belongs to and Telephone number.
10. If you want to change the address, click Change Address and specify the details.
11. Specify the Email address and Mobile No.
12. Select the applicable Language.
13. Assign the following features to the user if required:
• Only a Template User: Allow the user to create transactions from templates only.
• Super User: Grant the user the rights of a super user. With this feature, the user is empowered with the right to approve a payment instruction of any transactional value.
• View Confidential: Allow the user to view confidential information.
• Multi-Factor Authentication Required: Enable multiple factor approval for the user, while approving any transaction.
• Approval Level: Select the required number of levels to approve the user details. Click the Select Approval Matrix link to assign the defined approval matrix to the approval level.
![]() To assign all approval matrices
to the approval level, select the All
check box.
To assign all approval matrices
to the approval level, select the All
check box.
14. Subsidiary: Select the required subsidiary for which the user is being defined.
![]() To assign the user to all subsidiaries,
select the All check box.
To assign the user to all subsidiaries,
select the All check box.
15. Click Save and then Next. You can now assign permissions to the user.
16. Verify the information on Verify User page and submit for further processing by your financial institution.

| © 2017-19 Finastra International
Limited, or a member of the Finastra group of companies (“Finastra”).
All Rights Reserved.
Cat ID: FCM4.6-00-U02-1.5.3-201903 |