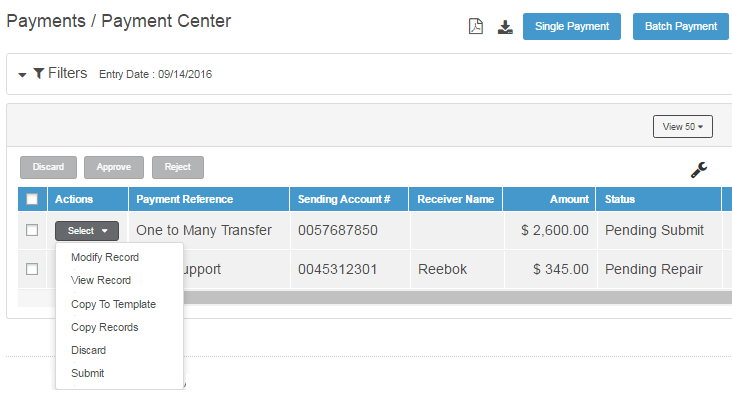
The Payments Summary page (Payment Center) in Fusion Cash Management (FCM) enables you to:
• View payment: User having rights to payment center can view all transactions based on user package rights irrespective of the user-account permissions.
• Initiate and verify payments: User can initiate transactions based on user-package, user-account permissions, and privileges.
• Actions on Payments: User can perform various actions on payment such as Discard, Submit, Approve, Reject, Send, Reverse, and Cancel.
• Approve payments: User can approve payment based on assigned privilege and approval workflow.
• Clone payments: User can clone transactions based on user-package, user-account permissions, and privileges.
• Create recurring transactions: User can initiate recurring transactions based on user-package, user-account permissions, and privileges.
• Upload files: User can upload transactions based on user-package, user-account permissions, and privileges.
This section provides information about:
The Payment Center allows you to search for a specific payment using details such as the payment type and creation date. You can also use custom filters to narrow down to a specific payment.
You can also customize the columns displayed on the Payment Center and specify the order in which the columns are displayed.
1. Navigate to Payments.
2. Click Payment Center. The Payment Center page is displayed.
3. Click ![]() icon to customize columns and column order. For more information, see
Summary information.
icon to customize columns and column order. For more information, see
Summary information.
The Summary Information page displays summarized transactions across
various corporate accounts, based on the specified filter
criteria. The Refresh![]() icon refreshes the data
on the summary page.
icon refreshes the data
on the summary page.
Page Element |
Description |
Filters |
You can narrow down the required definitions using the company name, saved filters, status, and entry date filter criteria. For more information about creating a new filter, see Creating a new filter.
|
Group by |
The existing transactions are listed on the grid based on the selected group on the settings page. |
Actions |
Select the records to perform various actions that are possible on a particular payment record. These actions can be taken independently or group action can be taken.
The following are the actions that can be performed: • Submit: Click Submit to approve the record modifications. • Reject: Click Reject to refuse the modifications. Specify the reject remark on the dialog box and click OK. • Discard: Click Discard to cancel the last activity performed on the record. • Approve: Click Approve to accept the record. • Send: Click Send to assign the transaction to the bank for further processing. • Reverse: Click Reverse roll back the transaction. FCM creates a reversal of the original transaction – by creating a new transaction with opposite effect (i.e. a debit transaction is created for an original credit transaction) and handing it off in clearing as a reversal entry with reference to the original transaction.
• Cancel: Click Cancel to request the bank to revoke the selected transaction.
· You can cancel the transaction before printing of CK, DD and PO. · For DD/PO Cancel action is allowed till Debited status. · After a DD/PO is cancelled (original status Debited) then GL request is sent to host for reversing the transaction entry. · After printing of checks, Cancel action is not available in payment centre. · After a transaction is cancelled it is not available for printing and not processed any further.
|
Selection box |
Select the check box corresponding to the transaction and perform the required action. |
Select dropdown |
Enables you to perform following actions: • Modify Record: Click to modify the transaction. • View Record: Click to view the transaction details.
• View History: Click to view the history of transaction creation and approval. • Copy To Template: Click to create a copy of the transaction to use it in future. • Copy Records: Copy the existing transaction to create a new transaction.
• Discard: Click to remove the transaction from FCM. |
Pagination Bar |
Depending on the volume of data displayed in the list, the list can have one or more pages. You can navigate through the page by using the pagination bar. |
Single Payment |
Enables you to create single payment. |
Batch Payment |
Enables you to create batch payment. |
Export |
You can export the summary information to the required format such as XLS, CSV, TSV, and Fedwire.
|
Report |
You can generate a PDF report of the summary information. |
View |
Click to see or set number of records on a single page. |

| © 2017-19 Finastra International
Limited, or a member of the Finastra group of companies (“Finastra”).
All Rights Reserved.
Cat ID: FCM4.6-00-U02-1.5.3-201903 |