A PO raised by the buyer must be accepted by a seller. The seller can also choose to accept a partial PO.
![]() If
the PO is raiser by the seller on behalf of a buyer, the PO can be verified
by the Buyer.
If
the PO is raiser by the seller on behalf of a buyer, the PO can be verified
by the Buyer.
This topic provides information on the following sections:
1. Navigate to SCF.
2. Click PO Center. The Purchase Order page is displayed.
3. Select one or multiple POs.
4. Click Accept from the PO actions. A popup window is displayed which asks you to Accept or Reject the PO.
5. All the selected POs are processed for acceptance, with the Accepted Amount set to the entire PO amount.
![]() You can also choose to make a partial
payment.
You can also choose to make a partial
payment.
6. If Partial Acceptance is allowed at client level, POs can be partially accepted using Accept option from the Select dropdown.
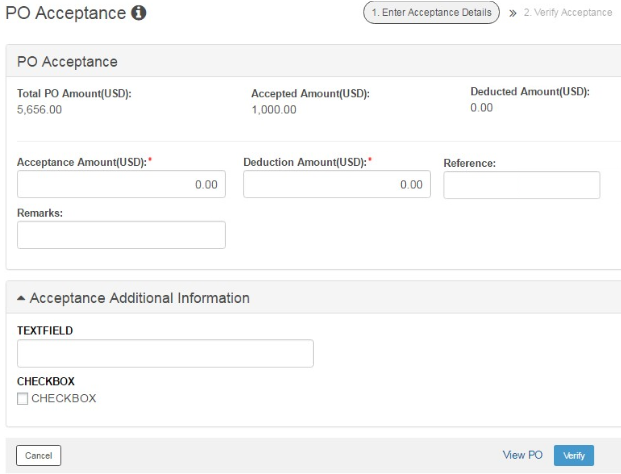
7. Click Accept from the Select dropdown. The PO Acceptance page is displayed.
8. Specify the following details:
• Acceptance Amount: Specify the amount that you want pay.
• Deduction Amount: Specify the partial amount that you want to deduct from the total PO amount.
• Reference: Specify the payment reference.
• Remarks: Specify the remarks, if any.
9. Click Verify to verify the partial PO acceptance.
10. Click Submit to submit the PO acceptance for approval.
![]()
· If Partial acceptance is allowed at client level, the PO can be accepted partially.
· If the workflow calls for approval of acceptance, these POs acceptance must be approved in the Acceptance Center.
![]() Acceptance Center is available in Seller
Mode.
Acceptance Center is available in Seller
Mode.
If the workflow calls for approval of acceptance made against a PO, you can approve a PO acceptance from the acceptance center, provided you have the relevant rights.
1. Navigate to SCF.
2. Click PO Center >> Acceptance Approval.
3. Use the Advanced filter to narrow down your search for POs with status For My Auth.
4. Select the PO that you want to approve.
5. Click Approve. The PO is now available for invoice creation.
You can also choose to reject a PO acceptance.
1. Click Reject instead of Approve from the PO acceptance center.
2. Specify the Reason to reject the PO acceptance. The PO acceptance is then marked as Rejected.
3. Any maker user having the relevant access rights can modify the PO acceptance as required, and then submit the PO acceptance again for approval.
4. Post changes user has to resubmit the PO acceptance as required and then submit the PO acceptance again for approval.
Only the PO acceptances that are rejected by a checker can be edited. PO can be edited for acceptance and deduction details.
1. From the Select dropdown click Modify Record for corresponding PO that you want to modify in the acceptance center.
2. Make the required changes.
3. Click Update to save updated information and save the PO. Status of PO acceptance changes to For Auth.
![]() All the edited or modified acceptance
request should be approved as mentioned above in the Approving
Acceptance.
All the edited or modified acceptance
request should be approved as mentioned above in the Approving
Acceptance.
![]() Related
Topics
Related
Topics
| © 2017-19 Finastra International
Limited, or a member of the Finastra group of companies (“Finastra”).
All Rights Reserved.
Cat ID: FCM4.6-00-U02-1.5.3-201903 |