Fusion Cash Management (FCM) allows you to place a request for stop pay of multiple checks in non-sequential order.
Check information can be specified manually or can be imported in Fusion Cash Management.
1. Navigate to Checks.
2. Click Check Management. The Check Management page is displayed.
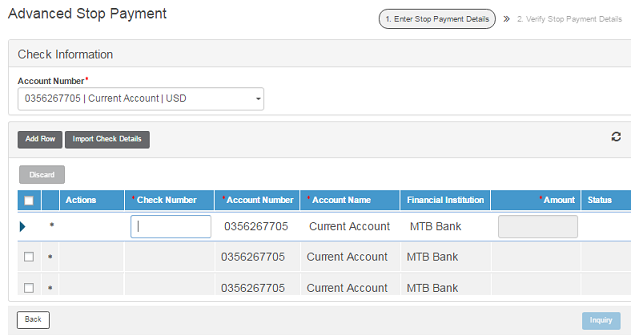
3. Click Stop Pay Request and then click Advanced Stop Pay. The Advanced Stop Payment page is displayed.
4. Select the required Account Number from the drop-down menu.
![]() Click Import
Check Details if you want to import data from a file to FCM. See
Importing Check Details.
Click Import
Check Details if you want to import data from a file to FCM. See
Importing Check Details.
5. Specify following check details in the grid:
• Check Number: Specify the check number that belongs to the selected account for inquiry.
• Account Number: Account number will be auto-displayed.
• Account Name: Account name will be auto-displayed.
• Financial Institution: Financial Institution name will be auto-displayed.
• Amount: Specify the amount.
![]() Click Add
Row to add a row to the grid and specify the check details.
Click Add
Row to add a row to the grid and specify the check details.
The maximum number of stop payment request you can place in a single request is set by your financial institution.
6. Click Inquiry to submit the check inquiry request. FCM displays the check inquiry status on the grid.
You can place the stop pay request only for the following status responses/statuses:
• Check is outstanding
• Check is voided/cancelled
• Check issued and cancelled
• No record of check found
• Item not found
![]() You can place stop pay request only for
the checks that are in Outstanding
status.
You can place stop pay request only for
the checks that are in Outstanding
status.
7. Select the check box for specific record to place a stop payment.
8. Click Stop Pay & Verify to place the stop pay request for the selected records.
9. Verify and Submit the request to host for stop pay.
The import check details option allows you to use an external data file to import check details.
1. Click Import Check Details. The Import Transactions pop-up window is displayed.
2. Select the required File Format Type. This list comprises all pre-loaded file formats available for the client.
3. Select a file from your network, using the Choose File option. If you are specifying the name of the file, specify the absolute path.
4. Click Import.
5. Select one of the Upload Action form the following options:
• Append: To import the data without affecting the existing data, if already present.
• Overwrite: To delete the existing data/records, and then upload the data from the file.
All advanced stop payment requests created in FCM must be approved.
1. Navigate to Checks.
2. Click Check Management. The Check Management page is displayed.
3. Select the required advanced stop pay request.
4. Click Approve to approve the advanced stop pay request.
![]()
· You can approve a check inquiry request with the Submitted status only.
· After approval, the status of the check inquiry request changes to Approved.
· You can also reject a check inquiry request using the above method. Select the check inquiry request and click Reject.
![]() Related
Topic
Related
Topic
![]() Creating
a stop payment request
Creating
a stop payment request
| © 2017-19 Finastra International
Limited, or a member of the Finastra group of companies (“Finastra”).
All Rights Reserved.
Cat ID: FCM4.6-00-U02-1.5.3-201903 |