The signatory matrix allows you to set limits for each product. For each limit, you must assign roles or users who are required to approve the transaction.
Defining a signatory matrix involves the following steps:
1. Navigate to Security.
2. Click Approval Matrix.
3. Click Create New Matrix to open the Signatory Matrix Definition page.
4. Specify the following details of the signatory matrix:
![]() Specifying signatory matrix
details
Specifying signatory matrix
details
![]() Specifying signatory matrix
tiers
Specifying signatory matrix
tiers
5. Click Update from the signatory matrix definition page.
6. Click Submit once all the approval tiers are defined.
![]() All definitions in Fusion Cash Management
(FCM) must be approved. For more details about approval, see Additional actions on setup.
All definitions in Fusion Cash Management
(FCM) must be approved. For more details about approval, see Additional actions on setup.
1. Specify the matrix details:
• Company Name: The company name is auto-displayed.
• Matrix Name: Specify a name for the matrix being defined.
• Matrix Type: Select Signatory Matrix.
• Number of Amount Tiers: Specify the number of amount tiers.
• Currency: Select the required currency for the transactions.
2. Click Save. A grid is displayed that allows you to define individual tiers.

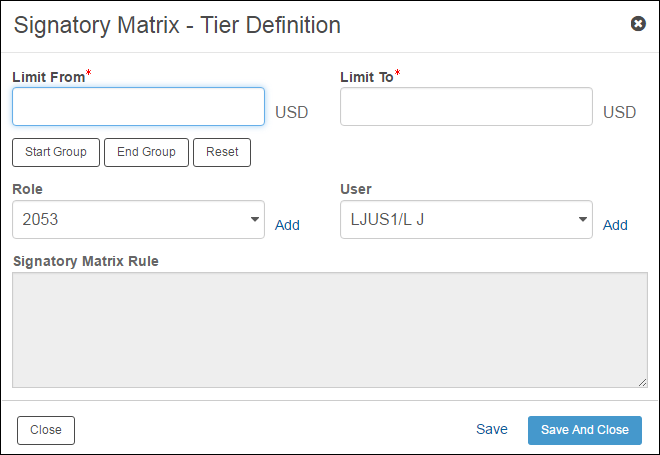
1. From Select drop-down, click Edit Tier. The Signatory Matrix-Tier Definition page is displayed. This page enables you to define the limits for the selected tier.
2. Specify Limit From and Limit To. Type the lower and the upper transaction limit in the respective fields, with the first level starting at zero. This limit is a range of transaction amount that decides the application of the approval rule. Any transaction initiated can be saved only if it satisfies the specified limit.
3. Click Start Group, if you want to use the logical operator AND between the category and the user that you include in the signatory matrix rule.
4. Click End Group, if you want to complete the usage of the AND operator. Any category or user you select hereafter will be followed by an OR operator.
5. Click Reset to remove all the combinations and start afresh.
![]() If there are multiple levels, the next
level of approval in sequence can begin only after the previous level
of approval has been completed.
If there are multiple levels, the next
level of approval in sequence can begin only after the previous level
of approval has been completed.
6. Select a Role and click Add, if you want to allow a role to approve the transaction. The selected category is displayed in the Signatory Matrix Rule box.
7. Select a User and click Add, if you want any particular user to approve the transaction. The selected user is displayed in the Signatory Matrix Rule box.
8. Click Save and Close to save the changes and navigate back to the Approval Matrix Definition page.

![]() Creating
approval matrix workflow
Creating
approval matrix workflow
| © 2017-19 Finastra International
Limited, or a member of the Finastra group of companies (“Finastra”).
All Rights Reserved.
Cat ID: FCM4.6-00-U02-1.5.3-201903 |