You must specify the payment details on the Template Details page. Specify the wire template details and navigate to the Verify Template page.
Click the![]() (info) icon to view
the additional transaction information:
(info) icon to view
the additional transaction information:
• Company Details
• Payment Source
• Product
• Type
• Entered By
The key details for the wire payments are:
![]()
· Fields marked with an asterisk (*) are mandatory.
· You can also fill in partial details, and save the transaction for later use.
1. Specify the following template settings details:
• Template Name: Specify the name to uniquely identify the template.
• Template Description: Specify the template description.
• Start date: Specify the start date for the template.
• End date: Select the end date for the template.
• You can create templates, depending upon your agreement with the bank. The following types of templates can be created:
– Repetitive: The Sending Account and Receiver cannot be modified.
– Semi Repetitive: The Sending Account cannot be modified.
– Non Repetitive: The entire template can be modified at the transaction level.
• Credit: The nature of the transaction as Credit is displayed on the page based on the selected product.
• Control Field: Select the required control fields from the drop-down list. You cannot edit the fields selected in control fields when you are creating a transaction using the template.
![]() You can
select all or deselect all control fields. To lock additional fields,
select the required control fields.
You can
select all or deselect all control fields. To lock additional fields,
select the required control fields.

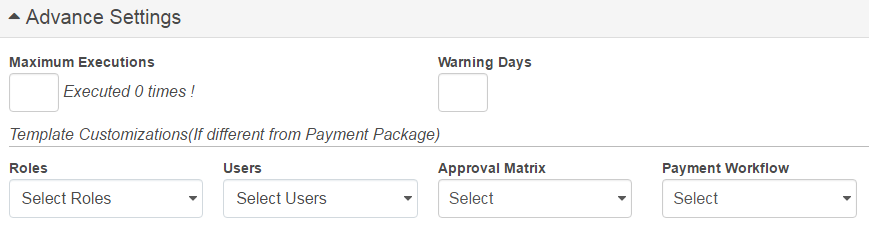
2. Specify the following details:
– Maximum Executions: Specify the maximum number of times the template can be executed. The template becomes inactive after the specified executions are done.
– Warning Days: Specify the number of days prior to which a warning must be displayed, if you are creating another transaction using the same template.
![]() If a transaction is created by using
the template on 16th August and warning days are set as 10 days, a warning
is displayed if you try to create another transaction before 26th August.
If a transaction is created by using
the template on 16th August and warning days are set as 10 days, a warning
is displayed if you try to create another transaction before 26th August.
• If you want to customize the template (If different from Payment Package), specify the following details:
– Roles: Select the required roles.
– Users: Select the required users.
– Approval Matrix: Select the approval matrix.
– Payment Workflow: Select the required payment workflow.
– Define Approval Matrix: Select the check box to create an approval matrix for the template. For more information, see Creating approval matrix for a template.
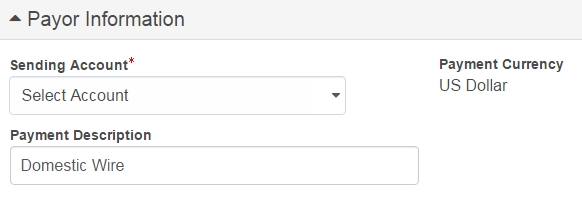
3. Specify the following payor details:
• Sending Account: Select the account from which the amount is to be credited.
• Payment Description: The payment description is auto-displayed.
• Payment Currency: The payment currency is auto-displayed.
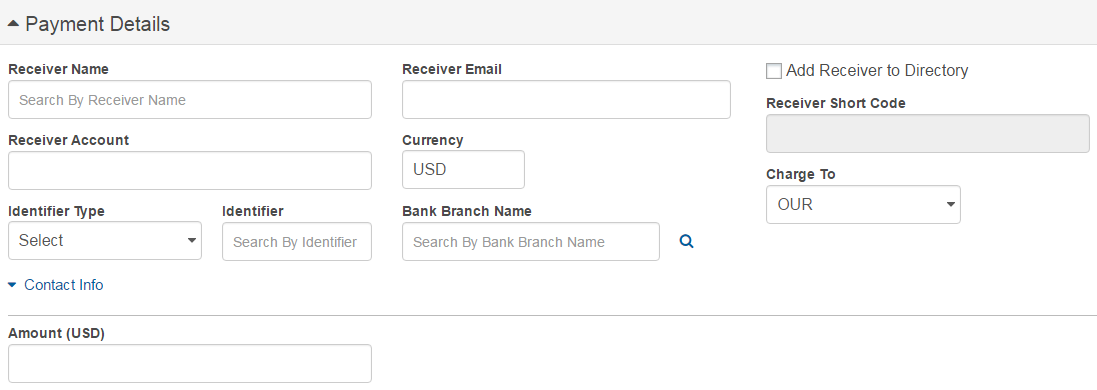
4. You can choose to create a payment template for a registered receiver or an adhoc receiver.
Registered Receiver
Register Receiver option allows user to make the payment to pre-defined receivers
1. Search and select the required receiver name from drop-down list. The Receiver Email, Receiver Account, Currency, Identifier Type, Identifier, and Bank Branch Name fields are auto-populated. The additional details such as address details are auto-populated. The Switch to Adhoc Receiver link appears on the page.
2. Amount: Specify the required payment amount.
3. Charge To: Select the required option in Charge To field. The available options are Select Charge To, BEN and OUR.
For additional details, see more receiver information.
Adhoc receiver
If the receiver does not exist in Fusion Cash Management (FCM), specify details about the ad-hoc receiver.
For field level details, see Adding a Receiver.
![]()
· You can choose to save this ad-hoc receiver in FCM for future use. Select the Add Receiver to Directory check box and specify the Receiver Short Code.
· Click here to view the special characters allowed for the Receiver Name field.
4. Click Verify to save the details and proceed to the Verify Template page.
![]() Where to go from here
Where to go from here
![]() Verifying
and submitting a payment template
Verifying
and submitting a payment template
| © 2017-19 Finastra International
Limited, or a member of the Finastra group of companies (“Finastra”).
All Rights Reserved.
Cat ID: FCM4.6-00-U02-1.5.3-201903 |