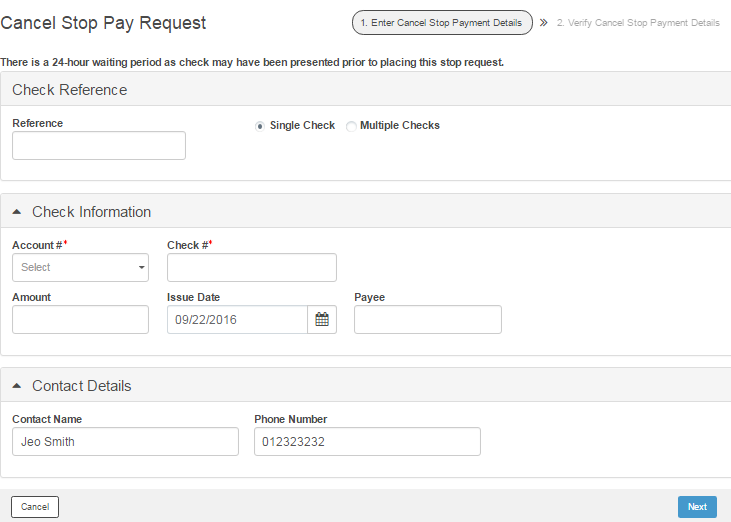
Fusion Cash Management (FCM) allows you to place a cancel stop payment request for a stop payment request raised using FCM and outside FCM.
1. Navigate to Checks.
2. Click Check Management. The Check Management page is displayed.
3. From the Select drop-down list, click Cancel for the respective stop payment record.
Using this option, you can raise a request to cancel stop pay requests raised outside FCM.
To raise a request to cancel stop pay:
1. Navigate to Checks.
2. Click Check Management. The Check Management page is displayed.
3. Click Stop Pay Request and then click Cancel Stop Payment. The Cancel Stop Pay Request page is displayed.
4. Specify a Reference ID to specify your cancel stop payment request in FCM.
5. Select the required option from the Single Check and Multiple Check.
6. Specify the following details for Single Check:
• Account #: Select the account number.
• Check #: Specify the check number for which the cancel stop payment request is to be created.
![]() For Multiple Checks option, specify
Check # From and Check
# To fields.
For Multiple Checks option, specify
Check # From and Check
# To fields.
• Amount: Specify the amount.
• Issue Date: Select the date on which the check was issued.
• Payee: Specify the payee name.
7. Specify the following Contact Details:
• Contact Name: Contact name will be auto-displayed.
• Phone Number: Phone number will be auto-displayed.
8. Click Next
to Verify and Submit the cancel
stop payment request.
![]() FCM displays the verification page based
on the configuration of Check Management
services during client on-boarding.
FCM displays the verification page based
on the configuration of Check Management
services during client on-boarding.

All cancel stop payment requests created in FCM must be approved.
1. Navigate to Checks.
2. Click Check Management. The Check Management page is displayed.
3. Select the required cancel stop payment request.
4. Click Approve to approve the stop payment request.
![]()
· You can approve a cancel stop payment request with the Submitted status only.
· After approval, the status of the cancel stop payment request changes to Approved.
· You can also reject a cancel stop payment request using the above method. Select the cancel stop payment request and click Reject.
![]() Creating
a stop payment request
Creating
a stop payment request
![]() Creating
an advanced stop pay request
Creating
an advanced stop pay request
| © 2017-19 Finastra International
Limited, or a member of the Finastra group of companies (“Finastra”).
All Rights Reserved.
Cat ID: FCM4.6-00-U02-1.5.3-201903 |