You must specify the details for the wire/domestic transfer on the Payment Details page, and verify the details on the Verify Payment page.
Click here to view the additional information.
The key details for a wire transfer are:
![]()
· Fields marked with an asterisk (*) are mandatory.
· You can also fill in partial details, and save the transaction for later use.
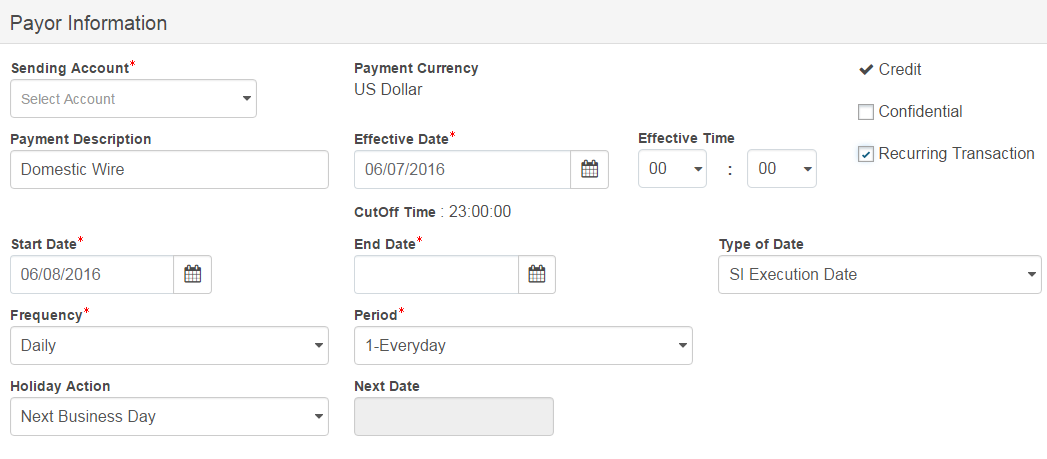
1. Specify the following payor details:
• Sending Account: Select the account from which you want to transfer funds.
• Payment Currency: The payment currency is auto-displayed.
• Credit: The nature of the transaction as Credit is displayed on the page based on the selected product.
• Payment Description: The payment description is auto-displayed. You can edit the payment description.
• Effective Date: By default, the current application date is displayed as Effective Date. You can change the date to a future date, if required.
• Effective Time: Specify the Effective Time if you want to debit your account and credit beneficiary account at specified time on a specific date.
![]()
· For future dated transactions, system processes transactions at specified time and stops processing warehoused transactions during BOD.
· If time is not specified, system processes transactions at BOD.
· If Effective Time > Cutoff Time, system displays an error.
· By default, the seller's local time is displayed as Effective Time.
• Confidential: The Confidential check box is auto-selected. You can not deselect the check box. If this check box is selected, the transaction is visible only to the maker of the transaction.
• CutOff Time: The cutoff time is auto-displayed. The transactions that are submitted after the cutoff time processes next day.
• WHT Applicable:
With
Holding Tax
is displayed based on the product setup. Select the option, if required,
and specify the details.
2. You can choose to create a recurring transactions based on the current transaction. Recurring Transactions are listed on the Recurring Transaction page. Specify the following details for recurrence:
• Start date: Specify the date from which you want the payment to start.
• End date: Select the end date for the recurring transaction.
• Type of date: Specify the required date on which the payment is to be made. The available options are:
– SI Execution date
– Effective date
• Frequency: Select the required frequency for the recurring transaction. The available options are:
– Daily: Select daily and specify the period for which you want the recurring transaction to recur.
– Weekly: Select weekly and specify the period. You can also specify the day of the week on which you want the recurring transaction to recur using the Reference Day field.
– Monthly: Select monthly and specify the period. Using the Reference Day field, you can specify the exact date on which the transaction should recur.
– Specific Day: Select the Specific Day. You can select the particular day of the week on which you want the recurring transaction to recur.
• Holiday action: Specify whether the recurring transaction must be executed on the Prev Business Day or Next Business Day, if the execution date of the recurring transaction falls on a holiday. You can also choose to skip the recurring transaction if the execution date falls on a holiday.
• Next date: The next execution date for the recurring transaction is auto-displayed.
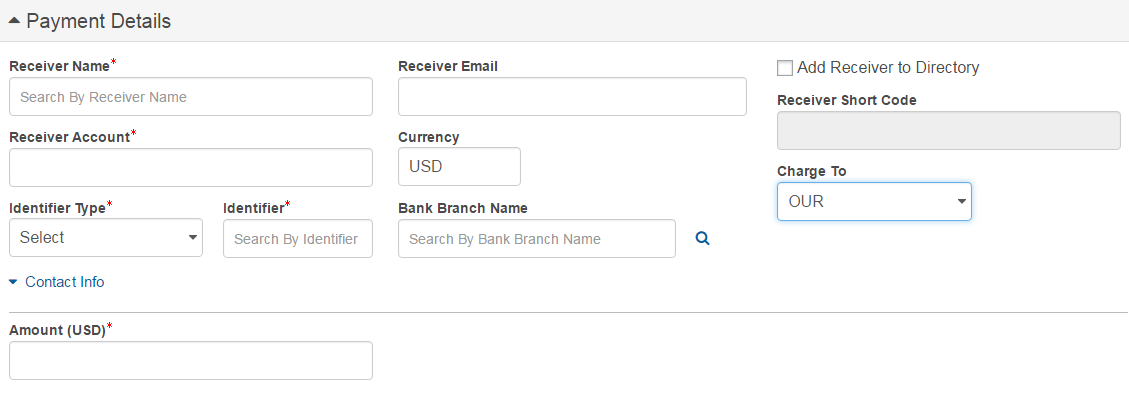
You can choose to make a payment to a registered receiver or an adhoc receiver.
Registered Receiver
Register Receiver option allows user to make the payment to pre-defined receivers.
• Search and select the required receiver name from drop-down list. The Receiver Email, Receiver Account, Currency, Identifier Type, Identifier, and Bank Branch Name fields are auto-populated. The additional details such as address details are auto-populated. The Switch to Adhoc Receiver link appears on the page.
• Amount: Specify the required payment amount.
• Charge To: Select the required option in Charge To field. The available options are Shared, BEN, and OUR.
For additional details, see more receiver information.
Adhoc receiver
If the receiver does not exist in FCM, specify details about the ad-hoc receiver.
For field level details, see Adding a Receiver.
![]()
· You can choose to save this ad-hoc receiver in Fusion Cash Management for future use. Select the Add Receiver to Directory check box and specify the Receiver Short Code.
· Click here to view the special characters allowed for the Receiver Name field.
Specify the following WHT details:
• Specify the WHT amount. This amount is the total taxable amount applicable.
• Specify the Receiver's Tax ID.
• Select the required Form Code. The available options are:
– 2307 (Default)
– 2306
• Specify the Certification Ref Number.
![]()
· If WHT Sequence No is configured as Auto in Client Profile, Certificate Ref Number is auto generated while printing the certificate.
· If WHT Sequence No is configured as Manual in Client Profile, specify the Certificate Ref Number details while printing the certificate.
• Click WHT Certificate Printing to print the certificate.
• Click Add WHT Details to specify the following WHT additional details:
– Nature of Income Payments: Specify the payment purpose.
– ATC: Specify the ATC Tax code details.
– 1st Month of Quarter: Specify the paid amount in the First month of the quarter.
– 2nd Month of Quarter: Specify the paid amount in the Second month of the quarter.
– 3rd Month of Quarter: Specify the paid amount in the Third month of the quarter.
– Total: Specify the total payment amount paid.
– Tax With Held For Quarter: Specify the total WHT amount for the quarter.
![]() The WHT amount is the division
of the taxable amount.
The WHT amount is the division
of the taxable amount.
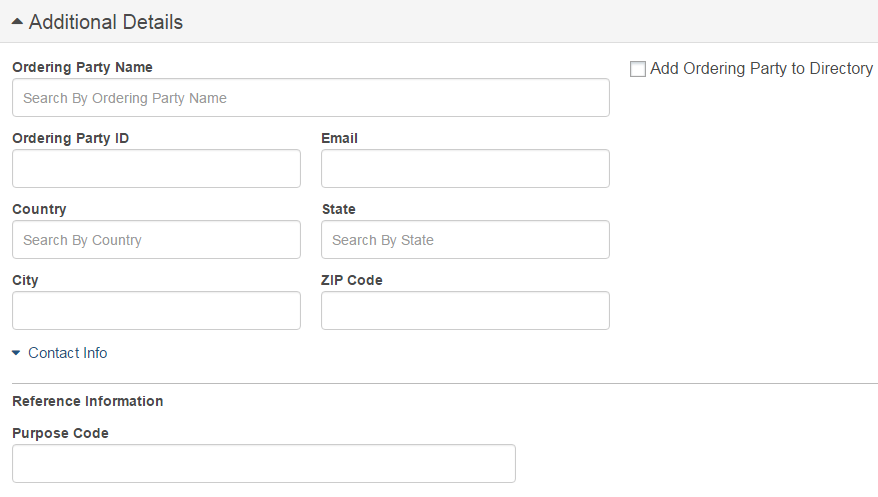
You can choose to make a payment to a registered ordering party or an adhoc ordering party.
Registered ordering party
Register ordering party option allows user to make the payment to pre-defined ordering parties.
• Search and select the name of the ordering party from the list. Details such as the Ordering Party Email ID, Ordering Party ID, Address, Country, State, City, and ZIP Code, contact details, Tag 50a information line 1 to 4 is auto-displayed for a registered ordering party.
• Purpose Code: Specify the reference information such as purpose code.
Adhoc ordering party
• If the ordering party does not exist in Fusion Cash Management (FCM), you must specify the required details about the ad-hoc ordering party.
• If you want to save the details of this ordering party for future use, select the Add Ordering Party to Directory check box. For field level details, see Adding an Ordering Party.
Click Verify to save the details and proceed to the Verify Payment page.
![]() Where to go from here
Where to go from here
![]() Verifying
and submitting the payment
Verifying
and submitting the payment
![]() Related
topics
Related
topics
![]() Creating
single recurring transaction
Creating
single recurring transaction
![]() Creating
batch recurring transaction
Creating
batch recurring transaction
| © 2017-19 Finastra International
Limited, or a member of the Finastra group of companies (“Finastra”).
All Rights Reserved.
Cat ID: FCM4.6-00-U02-1.5.3-201903 |